Monday, January 26, 2015

Smoke Photography

Magic Beanstalk
"Magic Beanstalk"


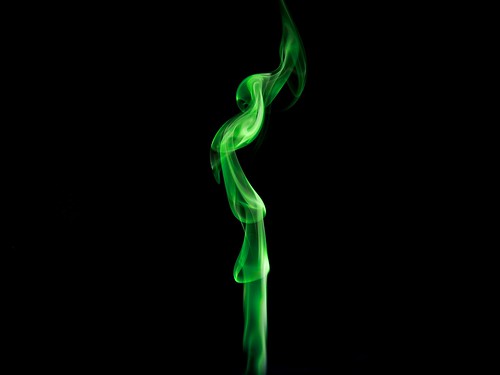
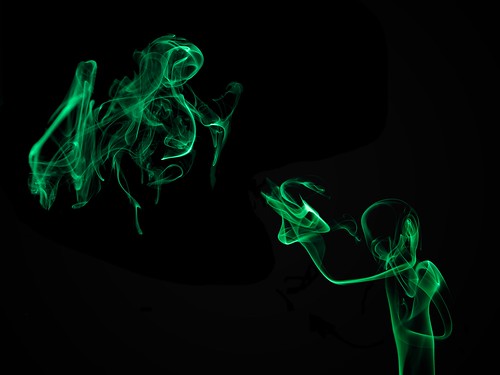
I've been meaning to try out photography for a while, and last weekend I gave it a shot. There are many tutorials on the Internet, but the basic steps I followed were as follows:

1) Set up in a place with a dark background. A black background isn't necessary, but a dark background helps.

2) Set up your off-camera flash towards the side and slightly behind. Zoom in to your maximum zoom setting on the flash - I used the 105mm setting on mine. Position the flash so that it lights the smoke and. I used just the one flash and no reflector. Some tutorials I saw suggested using a snoot on the flash, but I found that with the flash head zoomed in and the flash angled away from the background it wasn't really necessary. You can add color in post, but colored gels on your flash also works.

3) I used incense for the smoke - it works well.

4) We want to let the background go completely black, so use your highest sync speed and an aperture of f/8 or so to maximize depth of field.

5) Use manual focus and pre-focus on where the smoke will be.

6) Light up the incense and fire away! The smoke shapes are going to be random so take lots of exposures.

7) Post-processing can include removing some of the smoke trails, contrast and adding color. Composites are also fun!

Here's a link to some of the results!

Fighting His Demons
"Fighting His Demons"

Monday, January 12, 2015

The Endless Pour (Cinemagraph)


Lately I've been playing with Cinemagraphs - living photos which introduce a limited amount of movement into a still picture. Done well these can be very effective in bringing an extra dimension into a still image. (Like HDR, when overdone the results can be disastrous!)

I've been  using Flixel Cinemagraph Pro, a tool designed specifically for creating Cinemagraphs, though there are several ways of making them including using Photoshop. Cinemagraph Pro makes it fairly easy. You start with a video clip, select the part of the clip to use, choose a still frame and create a mask to show where the motion in the video will show. (You can even export the still frame, edit in any image editor and reimport.)

As you can see from the example above I've been having fun playing around with Cinemagraphs, and will be exploring them further!

Saturday, November 23, 2013

Making Sushi - Photo Of The Day, Nov 22, 2013

Making Sushi
Making Sushi
This was a quick candid shot I took at a sushi restaurant. I like the way the leading lines lead to the face of the sushi chef.

Wednesday, September 4, 2013

Photo Of The Day, Sept 4 2013 - Open

Open...
Open
This photograph was taken at a street food stall near Portland's Pioneer Square.

I liked the positioning of the knife in the middle of the frame; although you can't see the cook, the knife lends a playful element once you figure out what it is in relation to the food cart around it!

Tuesday, August 27, 2013

Photo Of The Day, Aug 27 2013 - Clouds Rolling In

Clouds Rolling In...
Clouds Rolling In, Nisqually Vista, Mt. Rainier
On this trip to Mt. Rainier it wasn't exactly a picture perfect sunny day - but the clouds made for a dramatic black and white image.

This was a single RAW image HDR processed with Nik HDR Efex Pro 2 and converted to black and white using Nik Silver Efex Pro 2.

Another image from the same hike:


Nisqually Vista
Nisqually Vista, Mt. Rainier
This was a 3 exposure RAW HDR, bracketed +- 2, HDR processing with Nik HDR Efex Pro 2.

Sunday, August 11, 2013

Big Wheel Keep On Turning - Photo Of The Day - August 11, 2013

Big Wheel Keep On Turning
Seattle's Great Wheel. I included the sun for a bit of flare, and post processed in black and white for dramatic effect.

Sunday, August 4, 2013

Locomotive Breath - Photo Of The Day, August 4, 2013

Locomotive Breath
Locomotive Breath
This is a photograph I took of the locomotive at the Mt. Rainier Scenic Railroad, which runs between Elbe, WA and Mineral, WA.

It's a beautiful 40 minute ride from Elbe to Mineral, with the train turning around at Mineral for the ride back to Elbe. I took this when the engine was turning around to join the back of the train.

 I used a manual focus Nikon 105mm f/2.5 AI at f/2.5, which gave me sharp focus for the engine and an out of focus background, which helped add to the vintage look. Black and white conversion was using Nik Silver Efex, and included using a blue filter to darken the green foliage for some additional contrast against the engine. I like the vintage look I was able to achieve.

Here's another shot I took which shows the gorgeous landscape in the background a little better:

Mt. Rainier Scenic Railroad - Mineral, WA
Engine, Mount Rainier Scenic Railroad